
RVing 101 Beginners Course
New to RVing? No problem, we are here to help! Check out these quick tips to become an expert in no time.
Quick Tips:
Rent vs Buy
There are so many types of RVs out there: from class A, B, and C to towables. Do you know which is best for you? Take it from The RV Advisor and start your RV experience by renting. After you have taken some major trips, you’ll get a good idea of what you need and want in your RV.
Put together a pre-flight routine and checklist
Consistency is a great way to developing good habits with anything, even when it comes to RVing. Before going on a trip, check all storage compartment doors, make sure the step is up, confirm that the antenna is down, check if your awning is retracted and tied up all the way (if your vehicle has one), check the fluid levels and tire pressure, make sure emergency brake is off, and make sure all the cabinet doors are shut properly. Remember, practice makes perfect.
Go with a pro
Maybe you have a family member or a longtime friend who owns an RV. If so, ask them about their RV and all the benefits and negatives about their experience. If possible, plan a trip together, so you get the fun of traveling in an RV without having all the stress and pressure of operating it alone.
You Should Know

Get to your destination as early as possible.
Nothing is worse than arriving late in the day or after dark and trying to set up camp. As a beginner, this would be a horrible way to start, considering you are not comfortable with your new vehicle yet. Arrive as early as you can and set up calmly and easily.
When it’s raining outside, your RV awning can be a lifesaver, but it is important to remember the water has to go somewhere. That’s where the pitching comes in.
Most RV awnings have adjustable pitches on each arm to control the angle of the surface. When it’s starting to rain, adjust the pitch to an appropriate angle. We recommend making the pitch slightly lower than the other to allow the rain to drain off and away from the site.
Manual awnings require special locking systems that have to be adjusted before use, whereas electric awnings can be used just with a flick of a switch. To use manual awnings, you’ll need to unlock the travel locks located on the side of the awning arms, and the cam locks on the top of the awning. You will need an awning rod to unlock the cam locks.
Get to your destination as early as possible.
Nothing is worse than arriving late in the day or after dark and trying to set up camp. As a beginner, this would be a horrible way to start, considering you are not comfortable with your new vehicle yet. Arrive as early as you can and set up calmly and easily.
Pitching and locking awning
When it’s raining outside, your RV awning can be a lifesaver, but it is important to remember the water has to go somewhere. That’s where the pitching comes in.
Most RV awnings have adjustable pitches on each arm to control the angle of the surface. When it’s starting to rain, adjust the pitch to an appropriate angle. We recommend making the pitch slightly lower than the other to allow the rain to drain off and away from the site.
Manual awnings require special locking systems that have to be adjusted before use, whereas electric awnings can be used just with a flick of a switch. To use manual awnings, you’ll need to unlock the travel locks located on the side of the awning arms, and the cam locks on the top of the awning. You will need an awning rod to unlock the cam locks.
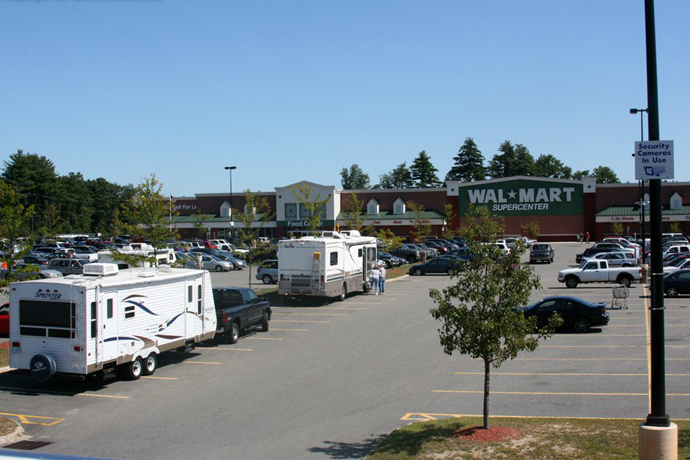
Camper friendly Walmart stores.
Need to stop along your RV journey? Certain Walmart stores offer free overnight camping for RVers. That’s right! Make sure that the store you are considering is one of them. There won’t be any water or utility hook-up, but it’s free! Find a Walmart store near you that allows free overnight stays for RVs
Also, make sure you don’t go to a Walmart store that does not allow over night camping. Find them at this website
Remember, certain cities/states do NOT allow this, so be sure to double check that as well!
Camper Friendly Walmart Stores.
Need to stop along your RV journey? Certain Walmart stores offer free overnight camping for RVers. That’s right! Make sure that the store you are considering is one of them. There won’t be any water or utility hook-up, but it’s free! Find a Walmart store near you that allows free overnight stays for RVs
Also, make sure you don’t go to a Walmart store that does not allow over night camping. Find them at this website
Remember, certain cities/states do NOT allow this, so be sure to double check that as well!

Pitching and locking awning.
Most RV awing’s have adjustable pitches (the angle) of the awning on each arm. When you see it’s about to rain, never set your awing with a flat pitch. We recommend a slight pitch on one side compared to the other to allow the rain to drain off.
Manual awnings require special locking systems that lock and unlock, but electric awnings can be setup with the flick of a switch. To use manual awnings, you’ll need to unlock the travel locks, located on the side of the awning arms, and the cam locks on the top of awning (you’ll need an awning rod to unlock the cam locks).
Pitching and locking awning.
Most RV awning’s have adjustable pitches (the angle) of the awning on each arm. When you see it’s about to rain, never set your awing with a flat pitch. We recommend a slight pitch on one side compared to the other to allow the rain to drain off.
Manual awnings require special locking systems that lock and unlock, but electric awnings can be setup with the flick of a switch. To use manual awnings, you’ll need to unlock the travel locks, located on the side of the awning arms, and the cam locks on the top of awning (you’ll need an awning rod to unlock the cam locks).
Double check that awning.
It’s always wise to make sure your awnings are rolled up properly and secured. The last thing you want is an awning coming unfurled from your vehicle while you’re on the interstate. Check your awning locks regularly and consider adding additional aftermarket locks as well to be safe.
RV Maintenances 101
- Like cars, RVs need their oil and filters changed at regular intervals to keep the engine running properly. Failing to do so will eventually cause your engine to seize, which could cost as much as $10,000 to fix. Most manufacturers suggest an oil change every 3,000 to 4,500 miles, but you should check your owner’s manual for advice on your specific vehicle to be sure.
- Getting your RV generator serviced is important as well. Again, check the manufacturer’s specific recommendations for how often the oil and filter should be changed. Ignoring this simple step could cost you as much as $9,000 in repairs. Also, remember to run your generator regularly when your RV is stored. If not used regularly, it could cost up to $400 to clean out the build-up on the unit’s carburetor.
- You should also remember to replace the air, fuel, coolant, and hydraulic filters regularly to prevent thousands of dollars in damages from increased fuel usage or overheating issues.
- Inspect roof seals and seams of your RV every six months. Water damage can cost hundreds or thousands of dollars to repair if it’s not taken care of immediately.
- Checking your brakes and making sure they are maintained is very important for your safety and other drivers as well. If not maintained, brake damage could cost as much as $2,000 for a motorhome and $500 for a trailer.
- Keep your waste water system in good condition by using biodegradable RV toilet paper. Also, occasionally use toilet chemicals to break apart anything that may be down there.
- If you have a rubber roof, make sure to have it treated at least once per year to prevent sun damage. You should also have a roof inspection at least twice a year to avoid any leaks.
- Make it a must to check your tire pressure and lug nuts before every trip to avoid any break downs or a road disaster.
- Check your batteries before any trip. Deep cycle batteries last 3-5 years and should be replaced after their life cycle is complete.
- Take your battery out during the winter months and store it somewhere warm to avoid freezing and breaking it, which would also void its warranty.
Cleaning the water tank
First, some things to consider before you start:
- Time – 6 to 12 hours to complete the job.
- Do you have internal and or external water filters? If so, you should change them after you have finished sanitizing the RV’s tank.
- Do you have a hot water tank? If you do, now might be a good time to flush it out (and while you’re at it, check to see if you need to change the anode).
- Read through these sanitize RV instructional steps before you begin.
Step 1: Gather all the tools and supplies you will need to sanitize the RV’s fresh water system. You will need:
- 1 external water filter (from Walmart’s RV section)
- 1 internal water filter – Hydro life C-2063/#5 filter is recommended
- 1 funnel with a flexible clear hose and stopper (from Walmart’s auto supply section)
- 1 water filter wrench (for the internal filter)
- 1 dab of petroleum jelly (for the O-ring on the water filter body)
- 1 Anode if you need it and the tools to remove it
- Clorox Regular-Bleach (unscented and non-gel). Calculate amount of Clorox.
Step 2: Partially drain the fresh water tank to about ½ its capacity.
Step 3: Prior to use, sanitize the funnel and hose with pure bleach. Let stand for 15 minutes, then discard the bleach in the funnel. Pour the Clorox into the fresh water fill using the funnel with the flexible clear hose.
Step 4: Refill the fresh water tank until water starts coming out of the overflow hose or until full.
Step 5: Turn off the fresh water supply to the RV, then turn on your water pump so it will draw water from the fresh water tank.
Step 6: Open every faucet in the RV including the hot water faucet until you can smell the bleach, then turn the faucets off. Remember to turn the power off to your hot water heater tank before you open the hot water faucets.
Step 7: Turn on the fresh water supply to the RV and add a few more gallons of fresh water to your freshwater tank. Now the waiting begins. For best results, wait a minimum of 3 to 4 hours to sanitize RV water system. We recommend waiting at least 6 hours.
Step 8: After properly waiting, drain the fresh water tank until empty and refill with fresh water until full.
Step 9: Turn off the fresh water supply to the RV and turn on your water pump. Start flushing the water lines by opening all the faucets. Leave them open until the smell of bleach has diminished. If after a few minutes, the bleach smell is still too strong then drain the fresh water tank again and repeat step 8 and 9.
Step 10: Turn off the water supply to the RV and remove the external filter, replace it with a new one. Make sure your water pump is off and replace the internal water filter with a fresh cartridge. Do not forget to dab a little petroleum jelly on the O-ring of the water filter body or you will have a hard time removing it next time you change the cartridge.
Step 11: See the brief overview below on how to flush the hot water heater since there are so many different tanks and configurations:
Turn the power off to the hot water heater. Turn off the water to the RV and make sure your water pump is off. Open the relief valve on top of the water heater to expel any pressure in the hot water tank. Open the hot water heater tank drain valve and leave it open until all the water has drained out. Inspect and or replace the anode. Close the relief valve and the drain valve. Turn water to the RV back on again and refill the hot water heater. Check for leaks around the anode or the drain valve.
After you have refilled the hot water tank, make sure that all air is expelled from the hot water heater before you power it back up again or you will burn out the heating element. Do this by opening all the hot water faucets until there is no more air and a strong stream of water follows. When you are sure that all the air has been expelled from the hot water tank, turn the power back on again for the hot water heater.
What is a grey water tank?
Your grey water tank collects the water you use in your RV that comes from your shower and your sinks such as your kitchen and bathroom sinks. Ideally, you should keep the valve closed, and allow the tank to fill up before dumping it. You should also add grey water tank treatment chemical, or your tank will start to stink. The water in the grey water tank is also very useful for another purpose– rinsing out your sewer hose when dumping your black water. You could also use a rinse wand in the toilet to rinse and flush the sewer hose, if your grey water tanks are empty. Holding tank treatments are available in RV stores. Pour the recommended amount in your kitchen drain, along with water – we would recommend using a formaldehyde-free treatment.
How to drain grey water from an RV?
- Always empty the black water first. (please refer to our instructions below on how to drain black water from an RV)
- Wear rubber gloves just in case so that you won’t get splashed.
- Remove the cap that covers the holding tank outlets, and connect your sewer hose.
- Put your sewer hose in the dump hole, going at least four or five inches deep.
- Secure it in place. You can use a brick or the cover of the dumping station to secure the hose firmly.
- You can now open the black water valve. When the tank is empty, open the grey water tank valve.
- Flush your tanks by refilling them, and them and draining them again.
- Close your valves, and valves and disconnect the hose from the outlet.
- Lift the sewer hose from the end of the RV to the dump hole, so as to get rid of any remaining water in the hose.
- Run water in it, if available, and to rinse it thoroughly.
- Disconnect the hose from the hole, and rinse the area around it, in case some spillage happened. Cover the hole.
- Store your sewer hose.
- Add RV water tank treatment to your tanks, and you are done emptying your holding tanks.
How to drain grey water from an RV?
Step 1: Always empty the black water first. (Please refer to our instructions below on how to drain black water from an RV)
Step 2: Wear rubber gloves so that you don’t get splashed.
Step 3: Remove the cap that covers the holding tank outlets, and connect your sewer hose.
Step 4: Put your sewer hose in the dump hole, going at least four or five inches deep.
Step 5: Secure it in place. You can use a brick or the cover of the dumping station to secure the hose firmly.
Step 6: You can now open the black water valve. When the tank is empty, open the grey water tank valve.
Step 7: Flush your tanks by refilling them and draining them again.
Step 8: Close your valves and disconnect the hose from the outlet.
Step 9: Lift the sewer hose from the end of the RV to the dump hole, so as to get rid of any remaining water in the hose.
Step 10: Run water in it, if available, and rinse it thoroughly.
Step 11: Disconnect the hose from the hole, and rinse the area around it, in case some spillage happened. Cover the hole.
Step 12: Store your sewer hose.
Step 13: Add RV water tank treatment to your tanks, and you are done emptying your holding tanks.
What is a black water tank?
Step 1: Gather all the tools and supplies you will need to drain the RV’s black water tank. You will need:
- Disposable gloves for handling the sewer hose.
- Rinse hose for your black water flush.
- Bleach wipes for sanitizing.
- Clear sewer adapter to know if your tanks have finished emptying.
- Sewer extension hose, recommend 30 feet if available.
- Coupler 90 bayonet fitting or 45 degree or straight fitting.
- Hand sanitizer for cleanup afterwards
Step 2: Start by pulling up to an RV dump station and lining up the black water holding tank drain valve as close to the opening of the dump station as possible. This will ensure that if there is an accident, it will be contained in the dumping area. If the RV has more than one location for your drain valves, always do the black tank first. Unlock any compartments on the RV that are needed to access and dump the tanks.
Step 3: Put on latex or other disposable gloves (to avoid any contamination) and get the sewer hose out. Before removing the cap to the holding tank drain opening, ensure that both gray and black water valves are closed.
Step 4: First, attach the hose to the dump station hole first. It is a good idea to use an elbow and a hose ring to connect the sewer hose to the dump station hole. This holds the hose in place and avoids any splatter or leakage. If you do not have access to the ring or elbow, insert the end of the sewer hose into the dump station’s hole about eight to twelve inches to prevent it from coming out during dumping. Use hole’s cover or something heavy enough to hold the sewer hose in place. Try to avoid anything too small to prevent it falling into the hole and clogging the dump station.
Step 5: Check the sewer hose to ensure that it is securely clamped to the adapter and prepare to attach to the holding tank drain outlet. Start by removing the cap with the sewer hose positioned underneath to catch any drips (open end up). Then, when any dripping has stopped, attach the sewer hose while ensuring the adapter is completely secured. A partially attached hose is more common than one may think, so make sure the tabs on the adapter are lined up properly with the stubs on the tank drain.
If the RV has a permanent-mount black tank rinse system, now is the time to connect it up to both the RV and the dump station water supply with a dedicated garden hose. Do not use a fresh water hose for the black tank rinse and do not turn water on until step 5 has been completed (a portable flushing wand may also be used for this step).
How to drain black water from an RV?
Pre-preparation:
- Disposable gloves for handling the sewer hose.
- Rinse hose for your black water flush.
- Bleach wipes for sanitizing.
- Clear sewer adapter to know if your tanks have finished emptying.
- Sewer extension hose, recommend 30 feet if available.
- Coupler 90 bayonet fitting or 45 degree or straight fitting.
- Hand sanitizer for cleanup afterwards
Step 1: Start by pulling up to an RV dump station and lining up the black water holding tank drain valve as close to the opening of the dump station as possible. This will ensure that if there is an accident, it will be contained in the dumping area. If the RV has more than one location for your drain valves, always do the black tank first. Unlock any compartments on the RV that are needed to access and dump the tanks.
Step 2: Put on latex or other disposable gloves (to avoid any contamination) and get the sewer hose out. Before removing the cap to the holding tank drain opening, ensure that both gray and black water valves are closed.
Step 3: First, attach the hose to the dump station hole first. It is a good idea to use an elbow and a hose ring to connect the sewer hose to the dump station hole. This holds the hose in place and avoids any splatter or leakage. If you do not have access to the ring or elbow, insert the end of the sewer hose into the dump station’s hole about eight to twelve inches to prevent it from coming out during dumping. Use hole’s cover or something heavy enough to hold the sewer hose in place. Try to avoid anything too small to prevent it falling into the hole and clogging the dump station.
Step 4: Check the sewer hose to ensure that it is securely clamped to the adapter and prepare to attach to the holding tank drain outlet. Start by removing the cap with the sewer hose positioned underneath to catch any drips (open end up). Then, when any dripping has stopped, attach the sewer hose while ensuring the adapter is completely secured. A partially attached hose is more common than one may think, so make sure the tabs on the adapter are lined up properly with the stubs on the tank drain.
If the RV has a permanent-mount black tank rinse system, now is the time to connect it up to both the RV and the dump station water supply with a dedicated garden hose. Do not use a fresh water hose for the black tank rinse and do not turn water on until step 5 has been completed (a portable flushing wand may also be used for this step).


